dinsdag 28 november 2017

Racal Cougar Standalone Programmer - Part 4

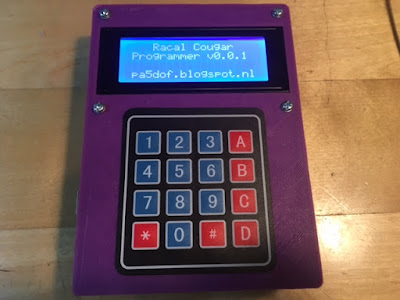
Since i posted about the stand alone programmer earlier this year i have been working on the protocol used to fill the crypto keys, a PCB for the programmer and a 3D printed case to house the electronics of the programmer.
Inside the programmer
In this post will try to give some details including the schematic and binary version of the code driving the programmer (the sketch it self will be released later).

Important:


This information is supplied "As is" meaning i'm not responsible for any damage to your precious Cougar. Also i don't have the time to support you on your build, feel free to send me an email message with questions but don't expect 24/7 support.

Schema


The design is basically made up of all the components described in a previous post, Racal Cougar Standalone Programmer - part 2 with the addition of some additional parts in a single schema used to create a custom PCB.

The programmer code should also work on a default Arduino Nano with a 4x4 keypad, an I2C LCD driver and a 20x04 LCD as long as you keep the pins connecting them to the ATMEGA 328 the same as used in the above schema.

A note on the I2C LCD driver

The I2C LCD driver is based on the NXP PCF8574A I2C 8-bit I/O expander. There are two versions of this IC: the PCF8574 and the PCF8574A which only differ in the usable I2C address range:

PCF8574         0x20 ... 0x27
PCF8574A      0x38 ... 0x3F

(see datasheet)

On the PCB and in the code i used the PCF8574A set to address 0x38.

PCB


I had some PCB's made that could be placed on top of the 20x04 LCD. This PCB contains the following parts:

  • DC-Jack and power regulator to generate 5 volt to drive the battery charger
  • Single cell Li-Po/ Li-Ion charger circuit with status leds.
  • 5 volt DC DC converter (without under-voltage protection so use li-po/li-ion's with protection circruit)
  • ATMega 328 micro controller (as used in Arduino Nano).
  • PCF8574A I2C 8-bit I/O expander set to address 0x38 (see datasheet)
  • Racal interface circuit (level shifter, DB9 connector)
The Gerber files for the PCB can be downloaded using this link.

Battery


I used a 18650 Li-Ion battery to power the programmer. There is no under voltage or reverse polarity protection so make sure you use a battery containing a protection circuit and when you accidentally connect it the wrong way around it will for sure damage the DC-DC converter IC.

The Sketch


I'm still working on the sketch and will release the code as soon as i think it is ready to be released. In the mean time i will provide a binary version of the sketch which can be downloaded using this link.

More information about how to upload hex files to the Arduino can be found on the Arduino forum using this link for example.


3D printed case


The housing of the programmer is made up of 3 separate parts that are tied together using M3 hex screws and M3 stand-off nuts:
  • Top part containing all the elctronics
  • 18650 battery holder that is placed on top of the keypad using 4 short M3 screws.
  • Bottom part with ventilation slots.
I printed these parts using PLA and PETG with a 0.4 mm nozzle and 0.2 mm layer height and as long as you set the correct speed/ nozzle temperature there is little shrinkage. I haven't tried to print the casing using  ABS.

The STL files for the housing can be downloaded using this link  


zondag 12 november 2017

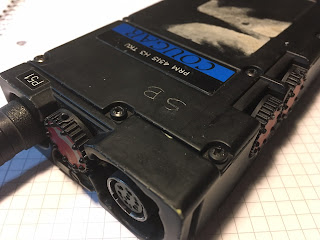
3D printed Racal Cougar Battery

I have been thinking of 3D printing accu's for the Racal Cougar for a while and this weekend i fired up OpenSCAD and had a go at it.


Like most of the older surplus radio devices there is a shortage of batteries for the Racal Cougar also. You can find them but most of them are dead and need their cells to be replaced. Replacing the cells is a matter of carefully opening the casing using a hobby knife or saw, removing the old cells and replacing them with newer cells.

The problem with this is there is little room in the casing and you need to solder the cells together which is tricky. I did this a couple of times and in some cases i even overheated the cells damaging them.


3D printed accu

Inspired by the MA-4516B from Racal i wanted to have something which i could take apart easily and use regular cells in without have to solder them.

Center, top and bottom parts

I designed the accu so it has 3 sections: a top section containing the locking mechanism and the power connections, a center section containing the cells and a bottom part.


Center part of the accu housing the cells.
Using the dremel i created two pieces of pcb and soldered battery springs coming from a couple of cheap battery clips. These boards connect the batteries together so the accu is made up of 8 serial connected cells.


When the bottom and top parts are connected to the center part using M3 bolts these boards will be sandwiched between it and stay in position.

The center contact is made up of a M3 Hex bolt cut to length and both metal lips on each side are coming from a dead donor accu.


What is next ?

The design is a tight fit, a bit to tight causing some tension on the bottom part. I need to redesign the parts so all parts fit without applying some tension. Also the metal lips currently come from a donor accu and i would like to create the from metal strips also so we have a 100% DIY accu.


woensdag 4 oktober 2017

Racal Cougar Standalone Programmer - Part 3

It has been a couple of months since my last post so its time for a quick update.

Last couple of months i have been busy working on the Racal Cougar Programmer and made two changes. I have made some hardware changes (more on that in a following post) and added support for crypto keys to it.


Have a look at the video above where i demonstrate how to program the keys using the programmer.

donderdag 8 juni 2017

Filling the Racal Cougar Crypto Keys using an Arduino Part II

This post will be about the protocol used by the Racal Cougar to fill the keys into the Crypto Board.
Before reading this post i recommend to read my previous posts about the mechanism used to program the Cougar: Program the Racal Cougar - Part 2 & Part 5

MA4083(G) Fill gun


Reverse engineering (again)


Like i did when figuring out the protocol used by the E.C.U and programmer to control the Cougar and fill the channel information, the first thing i did was hook up a fill-gun filled with known keys to the Racal Cougar and using the tap-cable making the data visible on an oscilloscope  (actually i used 2 fill-guns but more on that later) .

Tap cable
The difference compared with analyzing the date before was i now had a technical manual for the MA4073 programmer which provided me with useful information and hints.

Two different PWM data streams:


The datastreams used to fill the Racal Cougar can be divided in two types of data:
  1. Racal Cougar control data
  2. Key fill data

PWM timing


Control data:

The control data stream is described in the previous posts mentioned above, it uses PWM data modulated with a frequency of ~4 Khz. where one period takes 250 μS.

A logical '0' is send by pulling the F pin low for ~64 μS and high for 186 μS and a logical '1' is send by pulling it low for ~186 μS and high for 64 μS.

Control data takes 4 bytes (32 bit) and expect a echo to be returned from the Racal Cougar.

Key fill data:

The key fill data stream uses the same PWM modulation but with some differences compared to the control data. First of all the frequency of the PWM data is lower, it is ~1.42 Khz and second it is one continuous stream of 520 bits.

A key fill PWM modulated bit has a period duration of ~700 μS where a logical '0' is send by pulling the F pin low for ~96 μsec and a logical '1' is made by pulling it low for ~224 μS.


Fill commands and data


When sending key data to the Racal cougar the key fill data is preceded with 3 control commands each expecting an echo response :

  1. FTL command (HEX 7F8B)
  2. DSN command (HEX 7F03)
  3. ZA command (HEX 7F07)

After the ZA command, zeroise keys, is received the Cougar is generating a 1 Khz alarm tone on the audio line indicating the unit doesn't contain any crypto keys (you would get the same alarm when using the zeroise button on your Racal Cougar and select a crypto channel).

Next the 520 bits of key fill data are send which is handled directly by the crypto module. When no error's occurred the keys are stored in the crypto module which in turn disables the key alarm indicating a successful transfer.

Simplified overview of key fill commands

Key fill data


Information about the commands being send can be found in the technical manual of the MA-4073 and it tells you what in the previous paragraph but it doesn't tell you the actual structure of the key fill data. This is where the fun started :-)


Key fill data


Every transfer of key data starts with a fill instruction command, this command shouldn't be confused with the normal command structure, the fill instruction command are 8 bits preceding the actual key data and have the hexadecimal value of 30 (00110000).

Next there are 512 bits of key data, 128 bits for each key. 4 keys in total where the keys are stored in the following order: B, A, D, C.

Although the Racal Cougar can only handle 2 crypto keys, A & B, the crypto module can store 4 of them.

The 128 bits of a key contains the following data:

  • 12 bits of a predefined value, this is value is hard wired in the programmer and can be changed on customer's request. In general these are 12 one (1) bits.
  • 108 bits of actual key data, 36 octal (0...7) digits each using 3 bits.
  • 8 bit CRC using a different CRC-polynomial value for the different crypto boards.

Key data:


After the 12 predefined bits comes the actual key data, for every of the 36 digits 3 bits are added to the key data stream. The three digit bits are representing a binary value of 0 to 7 (octal) in Little Endian order (least  significant bit first).

The bit (LE)  values for the octal key digits:


0 1 2 3 4 5 6 7
000 100 010 110 001 101 011 111


To illustrate this, imagine we have a key made up of 8 digits with a value of '01234567'. The key data part of the stream would be the following 3 bytes:


Byte 1: 00010001
Byte 2: 01100011
Byte 3: 01011111


CRC


The last part of the 128 bit key data stream is used by a 8 bit CRC (cyclic redundancy check) value. This CRC value is used by the crypto module to check if all received bits are correct and the data hasn't been corrupted during communication between the programmer/ fill-in and the module.

CRC calculation is done by using a 8 bit CRC-checksum using a specific polynomial value. The crypto modules requiring a 'C' programmer/ fill gun are using a different polynomial value then the modules requiring the 'G' version.

C polynomial value: 1 11000000
G polynomial value: 1 01000010


By changing this polynomial value to match the target crypto module both can be programmed using the same Arduino programmer.


zondag 28 mei 2017

Filling the Racal Cougar Crypto Keys using an Arduino Part I


After being able to fill the Racal Cougar with custom channel frequencies using an Arduino the next step was being able to add new crypto keys using an Arduino also.


After spending a couple of days doing some reverse engineering using both a C and G MA7083 fill gun filled with known keys i was able to write a little Arduino Sketch that recorded the PWM modulation being send over the F-pin of the audio/fill connector.

At first the data stream didn't make any sense but after looking at it using a scope i noticed why the grabbed data looked like garbage and i had to change the grabber sketch to show the correct data.

Reading both tech manuals for both the programmer and a 4515 i got some info on the commands needed to be executed to do a key-fill and these were quickly identified in the datastream. The 'difficult' part was the key-data datastream and CRC checksum used.

In the movie at the top of this post you can see me changing and testing the Crypto Keys of two Racal Cougars.

Next post(s) will be about the commands and key-data datastream used.


maandag 22 mei 2017

Racal Cougar Standalone Programmer - Part 2

After playing with the initial version of the Arduino Racal Cougar standalone Programmer i decided i didn't like the cheap stick-on 4x4 keypad used so i replaced it with a different one. After make a new 3D model of the case and printing it this is the result:

Version 2 of the standalone programmer

Wonder what's inside it ? Besides a 4x20 LCD, Arduino Nano and a 4x4 keypad there is also a 3.7 volt 1200 m.a.h rechargeable battery with a Adafruit charger/ booster inside the case.

Inside the programmer


Programmer in action:


Besides working on the hardware i also completed the Arduino Sketch making the programmer fully functional and able to program the PRM-4515. 

An introduction and programming a cougar using the programmer can be seen in this video:


Used components:


I used the following components in this programmer. Please note that the provided links are displayed for  reference purposes and i am not affiliated to both shops.
Besides the component mentioned above i also used some items you probably have in your spare box:

  • DB9 female connector + mounting screws
  • Small power switch 
  • Power adapter  9 - 12v DC + chasis connector 
  • 2N7000 N-Channel mosfet
  • 10K resistor


dinsdag 16 mei 2017

Racal Cougar Standalone Programmer - Part 1

After completing the first version of the Racal Cougar Programmer i decided to make a standalone version of this programmer.

This post is a little sneak preview of this project i am currently working on.

 Development version of programmer with 4x20 LCD and keypad.
After collecting the required parts like an Arduino, 4x20 LCD, 4x4 keypad and rechargeable battery i started working on the user interface and menu. This was taking longer as expecting mainly because the existing menu libraries didn't fit my needs so i needed to write my own menu code.

At this moment the menu and user interface are complete, all features of the programmer can be controlled using the keypad and all what is left to do at software level is copying the code which is handling the actual programming  from the original programmer and execute it when the program menu option is selected.

The hardware displayed on the picture is a 3D printed case i made with the purpose of keeping all parts together while writing the Arduino code.

Development version inside view.

As you can see on thee picture it is missing some essential parts like a bottom and parts like the rechargeable battery and controller are just tossed in there.

So on the Hardware part there is still a lot to do and this will be next on my to do list.

Programmer in action:


If you are in a hurry and looking for a working solution to program your Racal Cougar PRM4515 check this post were you can find the schematic and a linkt to the Arduino sketch of my console-based programmer using an Arduino.


zaterdag 4 maart 2017

Program the Racal Cougar - Part 7

This week i added support for the PRM 4515 H (132-174) models to the Arduino Racal Cougar Programmer.


PRM 4515 H

I received a package from the UK containing a PRM 4515 H model from a fellow OM for me to use to test the programmer for this particular model. (Thanks Dave !)

After making some changes to the frequency logic in the programmer code, mainly add support for the 100 Mz digit which was hard coded to '0', the programmer was able to program this model also.

Model selection:

When the Cougar is turned on it sends a 52 bit datastream, 7E 0D 7E 0D 60 4C 4, which i thought was some kind of model identification used by peripheral devices. This could be useful for the programmer to automatically select the right model and frequency bounds supported by the model.

The fist thing i did after receiving the H model was slide it in a S.M.T. and hook it up to an Arduino using the tap cable between the S.M.T and E.C.U and turn it on to register this data datastream and the result was a bit disappointing: the same datastream as the L model was send by this model. This means it's not possible to automatically identify the model connected to the programmer so this has to be done manually.


Main menu with model selection option.

To select the model connected to the programmer i added the 'm' (lower case M) menu option which brings up the model selection sub menu:

Model selection sub menu
Model selection is needed to define the lower and upper bounds of the programmable frequencies, use the correct Eeprom stored frequencies and determine if the model supports disabling the transmitted 150 hz pilot tone.

By default the programmer starts up with the L model selected, this can be changed in the Arduino sketch by changing the following line:

uint8_t selectedModel = MODEL_L;

to
uint8_t selectedModel = MODEL_H;

H model frequencies

The PRM 4515 H model operates from 132 to 174 Mhz in 20 Mhz bands. Which band it operates on is defined by the model number:


ModelBand startBand end
H3TAU132 Mhz151.9875 Mhz
H3TBU134 Mhz153.9875 Mhz
H3TCU136 Mhz155.9875 Mhz
H3TDU138 Mhz157.9875 Mhz
H3TEU140 Mhz159.9875 Mhz
H3TFU142 Mhz161.9875 Mhz
H3TGU144 Mhz163.9875 Mhz
H3THU146 Mhz165.9875 Mhz
H3TIU148 Mhz167.9875 Mhz
H3TJU150 Mz169.9875 Mhz
H3TKU152 Mhz171.9875 Mhz
H3TLU154 Mhz173.9875 Mhz

This band can be changed by changing some resistor jumpers as described on the pmrconversion.info site.

It is important to know the band your H model is operating on before using the Arduino Racal Cougar programmer. Trying to program a frequency outside your model its band will result in a program error.

150 hz pilot tone

The PRM 4515 H model doesn't support disabling of the 150 hz pilot tone using the programmer. This setting will be ignored when programming the H model.

Arduino Sketch

The new version, lets call it v0.0.3 to illustrate this is experimental software, can be downloaded using this link.

Update 15-10-2015: A new version v0.0.4 is available that fixes the default channel data being garbage when a fresh Arduino was used and channel data hasn't been stored before. Download this version using this link

See my previous post on the Arduino hardware used and installation instructions.


zondag 12 februari 2017

Program the Racal Cougar - Part 6

Arduino boxed up and connected to the E.C.U.


This post is about the hardware and software i used doing my experiments.

I used an Arduino Nano V3 (cheap clone) with a minimum of additional components, mostly to perform the level shifting and have a visual indication of the programming result.

At this moment there is no support for the Fill Gun functionality yet. This will be added in future version.

Schema:


The Arduino is powered using the USB Host using an USB cable and requires no external power source.

The schema is simple, the most important parts are the Arduino itself and the level shifter made using the 2N7000 mosfet. A bicolor led is added to have some visual confirmation of the programming result and a reset button for reseting the Arduino program.

Installing the Arduino Sketch

After you have downloaded and installed the Arduino IDE (Arduino Getting started) it is best to test your Arduino by connecting it using an USB cable and load the "Blink" example available in your Arduino IDE.

If you have the "Blink" sketch running and the led at pin #13 is blinking you have successfully installed the IDE and managed to load a sketch to your Nano.

Next is the Racal Cougar Program sketch which can be downloaded using this link.

After you have downloaded, unzipped and opened the sketch (file ending with the .ino extension) in your Arduino IDE you can upload it to your Arduino. After successfully uploading the sketch it will start running and the red led and green led should light up for 1 second in turn indicating it is ready to go.

Next is opening the Arduino Monitor (console) which you can use to control the programmer. This can be done by pressing Ctrl + Shift + M. Make sure the line ending and baud rate of the monitor are set to "Both NL & CR" and 19200.

After opening the monitor console the following should be visible:

Main menu

More information about the programmer menu and functions is described in a previous post.

Supported PRM models


At this moment the software is configured and tested for use of the PRM4515L (4 meter) model only.   Although programming the other PRM4515 models is based on the same principal i haven't implemented this yet, mainly because currently i have no other models available to test the functionality with.

If you have one of the other models and want to test the programmer for a particilar model please let me know and i will make some changes to the software for you to test.

Update 05-03-2017:

Version 0.0.3 of the Arduino Racal Cougar Programmer now supports the PRM 4515 H models, see next post.

Update 15-10-2015:

 A new version v0.0.4 is available that fixes the default channel data being garbage when a fresh Arduino was used and channel data hasn't been stored before.

Important

This is an experimental project and you are using this software at your own risk. I am not responsible for any damage to your precious Racal Cougar !


zaterdag 11 februari 2017

Program the Racal Cougar - Part 5


The Racal Cougar uses PWM serial data over the audio connector its F pin to control and program the tranceiver. (see part 2). This part describes the commands i recorded using an Arduino and a tab on the cable between the Racal and E.C.U. (Remote Control Unit MA-4730) or Fill Gun (MA-4083)


Tap on F & E pins

Commands


Every command send by the ECU and Fill Gun / Programmer consists of at least 4 bytes of data; a header and instruction byte repeated twice, so byte 1 and 3 are similar and so are byte 2 and 4.

Depending on the type of command 20 additional bits of data are appended to the command maing the size of the data stream 52 bits.

(Almost) every command is echoed back by the Racal cougar after it has been processed successfully. The difference between  normal command and echoed command is bit 7 of the command header. On echo this is set to '0'.

The following command tables have an echo column which describe if an echo is to be expected.

Controlling the Racal Cougar:

Channels

Select channel

HEXByte 1Byte 2Byte 3Byte 4Echo
Channel 07F007F0001111111000000000111111100000000Y
Channel 17F087F0801111111000010000111111100001000Y
Channel 27F047F0401111111000001000111111100000100Y
Channel 37F0C7F0C01111111000011000111111100001100Y
Channel 47F027F0201111111000000100111111100000010Y
Channel 57F0A7F0A01111111000010100111111100001010Y
Channel 67F067F0601111111000001100111111100000110Y
Channel 77F0E7F0E01111111000011100111111100001110Y
Channel 87F017F0101111111000000010111111100000001Y
Channel 97F097F0901111111000010010111111100001001Y

Squelch


Squelch

HEXByte 1Byte 2Byte 3Byte 4Echo
Open7E0D7E0D608C501111110000011010111111000001101Y
Data:
01100000100011000101

Close7E0D7E0D600C401111110000011010111111000001101Y
Data:
01100000000011000100


Mode


Mode

HEXByte 1Byte 2Byte 3Byte 4Echo
Clear7E0D7E0D600C401111110000011010111111000001101Y
Data:
01100000000011000100

Select Secure7E0D7E0D620C501111110000011010111111000001101Y
Data:
01100010000011000101

Use Cypher A7ED37ED30000101111110110100110111111011010011Y
Data:
00000000000000000001

Use Cypher B7ED37ED38000001111110110100110111111011010011Y
Data:
10000000000000000000


To select a Secure channel 2 commands need to be given, "Select Secure" and "Use Cypher A/B"

Programming the Racal Cougar


Program

HEXByte 1Byte 2Byte 3Byte 4Echo
Init (FLT)7F3B7F3B01111111001110110111111100111011N
Start (FTXI)7F3B7F3B01111111001110110111111100111011Y
Disable Tone7FB37FB301111111101100110111111110110011Y
Channel 0 TX7E007E00240E001111110000000000111111000000000Y
Data:
00100100000011100000

Channel 0 RX7E807E80240E001111110100000000111111010000000Y
Data:
00100100000011100000

Channel 1 TX7E087E08E40E001111110000010000111111000001000Y
Data:
11100100000011100000

Channel 1 RX7E887E88E40E001111110100010000111111010001000Y
Data:
11100100000011100000

Channel 2 TX7E047E040C0E001111110000001000111111000000100Y
Data:
00001100000011100000

Channel 2 RX7E847E840C0E001111110100001000111111010000100Y
Data:
00001100000011100000

Channel 3 TX7E0C7E0CCC0E001111110000011000111111000001100Y
Data:
11001100000011100000

Channel 3 RX7E8C7E8CCC0E001111110100011000111111010001100Y
Data:
11001100000011100000

Channel 4 TX7E027E02AC0E001111110000000100111111000000010Y
Data:
10101100000011100000

Channel 4 RX7E827E82AC0E001111110100000100111111010000010Y
Data:
10101100000011100000

Channel 5 TX7E0A7E0A6C0E001111110000010100111111000001010Y
Data:
01101100000011100000

Channel 5 RX7E8A7E8A6C0E001111110100010100111111010001010Y
Data:
01101100000011100000

Channel 6 TX7E067E06820E001111110000001100111111000000110Y
Data:
10000010000011100000

Channel 6 RX7E867E86820E001111110100001100111111010000110Y
Data:
10000010000011100000

Channel 7 TX7E0E7E0E420E001111110000011100111111000001110Y
Data:
01000010000011100000

Channel 7 RX7E8E7E8E420E001111110100011100111111010001110Y
Data:
01000010000011100000

Channel 8 TX7E017E01220E001111110000000010111111000000001Y
Data:
00100010000011100000

Channel 8 RX7E817E81220E001111110100000010111111010000001Y
Data:
00100010000011100000

Channel 9 TX7E097E09E20E001111110000010010111111000001001Y
Data:
11100010000011100000

Channel 9 RX7E897E89E20E001111110100010010111111010001001Y
Data:
11100010000011100000

End(DN)7F037F0301111111000000110111111100000011Y

A program sequence is made up of the following steps where step 3,4 and 5 are repeated for every channel to be programmed:
  1. Init
  2. Start
  3. Disable tone (optional)
  4. Channel n TX
  5. Channel n RX
  6. End
The Disable Tone command can be omitted if a 150 Hz pilot tone is requested for the selected channel.

The Init, Start and End commands are needed to store the new channel data in the Racal's EEProm. Using the Program Channel commands without this results in the channel data only being stored in RAM and thus reset back to its original info after powering down the unit.

In the table above the following frequencies are programmed:


TXRX
Channel 070.250 Mhz70.250 Mhz
Channel 170.275 Mhz70.275 Mhz
Channel 270.300 Mhz70.300 Mhz
Channel 370.325 Mhz70.325 Mhz
Channel 470.350 Mhz70.350 Mhz
Channel 570.375 Mhz70.375 Mhz
Channel 670.400 Mhz70.400 Mhz
Channel 770.425 Mhz70.425 Mhz
Channel 870.450 Mhz70.450 Mhz
Channel 970.475 Mhz70.475 Mhz

The "algorithm" to set a specific frequency was described in part 2.